
I’m Khal Jahromi from KR Sabers. In this DIY lightsaber tutorial I’m going to show you how to add a leather wrap to your lightsaber hilt. The project may take approximately 15 minutes.
I’ve been building sabers for a while now and I started off in the DIY aspect. Although there are other tutorials out there I have my own way of doing things. I’m not saying it is the right way, I just say I have my own way of doing things and it’s always good to share them with people.
I’m wrapping a KR Sabers hilt in the tutorial. The wrapping process is similar for most lightsabers hilts, but the KR Sabers hilts are blank kits that you can customize in many different ways (add weathering, leather wrap, etc.).
This site contains affiliate links to products. SaberSourcing may receive a commission for purchases made through these links at no cost to you.
RELATED LIGHTSABER SELLERS affiliate links
ETSY Lightsabers
AMAZON Lightsabers
EBAY Lightsabers
SAFETY DISCLAIMER
This tutorial involves using a sharp blade. If you’re under the age of 18 please seek assistance from an adult when using sharp tools like the rotary cutter.

What You Need
MATERIALS
• lightsaber hilt of your choice
Possible Source: KR SABERS Lightsaber Hilts
• leather strip
Possible Source: defconbird (eBay seller)
• contact adhesive in a tin or a spray can (NOT super glue)
Possible Source: AMAZON Contact Adhesive
TOOLS
• a rotary cutter
Possible Source: AMAZON Rotary Cutter
• a fine tip pen/pencil (non-permanent)
• a ruler (or something with a straight edge)
• a small paint brush or paint scraper (only if using contact adhesive in a tin)
• gloves
• cutting mat
Possible Source: AMAZON Cutting Mat
STEP 1: Prepare the Workspace
Gather your all of the listed Materials and Tools onto a clean, flat surface.
My hilt is a KR Sabers hilt. The leather strap comes from defconbird (eBay). It’s really nice soft leather and 100% genuine leather that is pre-cut for lightsaber hilts. You could also buy leather hides on eBay or online and you can cut the leather hide yourself. The great thing about defconbird is he does all of that for you and offers different thicknesses and different strips so it’s quite useful. So if you want to save yourself some time and support some of the people in the lightsaber community, pick up some leather straps from defconbird.
I use multi-purpose contact adhesive because it’s easier to remove than super glue. If you every want to remove a wrap attached with super glue, you will ruin the leather. The leather will get really stuck to the hilt and you have to really scrape it off or sand it off. Using a contact adhesive allows you to peel the leather away and it doesn’t leave any horrible residue. If it does leave residue, simply wipe away the residue with some acetone or nail polish remover.
In the tutorial I’m using contact adhesive in a tin, but you can use spray contact adhesive which would eliminate the use for a paintbrush.
I recommend that you use a fine tip pen (non-permanent) or pencil. Please note, I’m using a permanent marker in this tutorial for demonstration purposes only to make the dots and lines easier for you to see.
STEP 2: Mock Up the Wrap
Let’s get started! What we want to do first is mock up how we’re going to be putting the leather on the hilt. Some people want wider spacing and some people want thinner spacing. You need to figure out exactly how you want it. A place to start is to uncoil your leather. I tend to start from the back of the hilt where the Covertec wheel is or will go.
Just start wrapping the leather around the hilt. There is no right way or wrong way. Everyone has their own way. You just want to start wrapping it really and looking out for the edge underneath the wrap. You want to keep a consistent edge throughout in order to give you a nice, even leather wrap.

STEP 3: Mark Where the Last Two Edges of Leather Meet
Once you start to get to the edge where you’d like the wrap to end, get your pen and mark a small line where the last two edges start to meet. Now you’ve got that line where the two bits of leather meet once the hilt is fully wrapped.
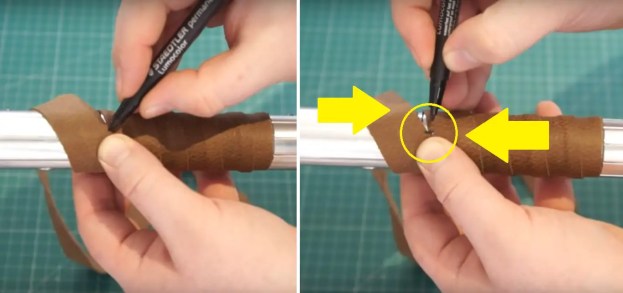
Now when you unravel the strip, you’ll have two reference points on your leather.

STEP 4: Connect the Dots
Using your ruler and pencil, draw a straight line from one dot to the other. This will give you your cutting edge. You want to use a thin writing utensil like a pencil. I’m using permanent marker just for demonstration purposes. Now you’ve got the line where I want to cut the leather.

Step 5: Cut the Leather
On a cutting mat or safe surface, get your rotary cutter and put the ruler against the line. Be careful, these blades are very sharp! Holding the ruler in place, cut along the line on the leather strip. If you’re using a defconbird leather strip, each strip is long enough that you can wrap two hilts with a shorter grip section.

Step 6: Mock Up the Wrap Again
Now we’ll test the leather strip again and see how the newly cut piece looks on the hilt. We’ll start at the back of the hilt again and just do a quick wrap. Make sure that the edge is even. Now you see the wrap fits perfectly on the hilt. The edges are flat and seamless and you’ve got no extra soft leather hanging over so that mock up is good.

Step 7: Apply the Contact Adhesive
When the second mock up looks good, lay your leather on your work surface. Make sure you’re working on a flat surface. Using your paintbrush or paint scraper, start applying the contact adhesive to the bottom edge of the leather. Leave a small section unglued at the other end. Apply the adhesive thoroughly, liberally and somewhat evenly across the leather except for the small unglued section at the end.
Contact adhesive is a bit stringy sometimes. It’s good that contact adhesive doesn’t dry immediately and it’s great for fabric materials. You just want to coil it around your paintbrush or whichever brush you’re using.
Don’t worry about getting the contact adhesive on your surface because you can just wipe it away. When the contact adhesive dries it’s sort of like latex and you can just wipe it away. It will be a little bit sticky so it gets tacky but not tacky enough that it will be firmly bonded to your fingers.

Step 8: Wrap the Leather Around the Lightsaber Hilt
Beginning at the bottom back of the hilt, start wrapping the leather strip around the hilt. Wrap around the hilt until you reach the final unglued section. Contact adhesive is really easy to work with. When the adhesive dries it will be a really nice bond and it won’t peel away. Note: The hilt is upside down in the photo.

Step 9: Finish the Last Corner and Let Dry
Apply contact adhesive to the final unglued section of the leather. Let the adhesive dry slightly, maybe blow on it a bit, to point that the adhesive becomes a bit tacky in consistency. Drag the edge over, press it down, and you’ve got that nice clean edge. If you’ve got any adhesive on your fingers, you can just rub your hands together and the friction just takes it off.
Give the leather wrap a good squeeze and roll it in your hand so that you get a nice bond. Any bits of excess adhesive you can literally wipe away because it’s contact adhesive and not super glue. Give the wrap about 2 to 3 hours to dry.

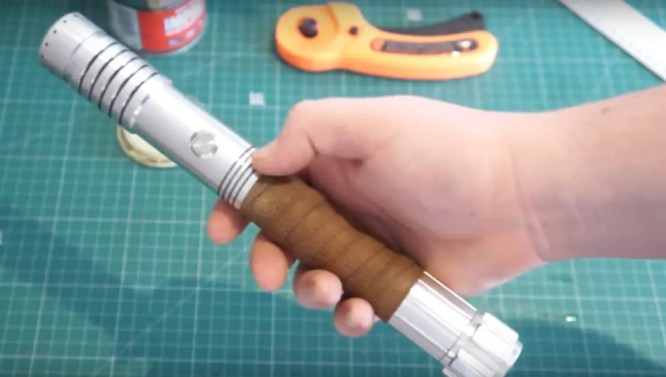
There you have it, a perfect wrapped lightsaber hilt! Although a leather wrap may seem a bit complicated when you see it on a lightsaber, adding a leather wrap is actually fairly simple. In about 10-15 minutes you can add a nice comfortable grip to your lightsaber hilt.
* * *
Note from SaberSourcing: This tutorial is adapted into article form, with permission, from the KR Sabers YouTube video DIY Tutorial: How to apply a leather wrap to your lightsaber.
Khal Jahromi is the founder of KR Sabers, a United Kingdom based custom saber company. The company sells empty hilts, lightsaber parts and accessories, and also offers custom install services.
KR Sabers website
http://krsabers.com
KR Sabers YouTube Channel
https://www.youtube.com/channel/UC72cqPZ6hBktjhnKBvcJlUA
COVER IMAGE CREDIT KR Sabers
Image depicts a KR Sabers lightsaber hilt with a leather wrap.